

How To Create A Server On Google Cloud
Google Cloud Platform (GCP), offered by Google, is a suite of cloud computing services that runs on the same infrastructure as Google search engine and YouTube.
All GCP data centers are connected through Google's backbone network, one of the biggest and fastest in the world.
In this tutorial, we will show you how to set up a Google Cloud server to host your websites (web application).
A short video tutorial (less than 3 minutes long) is also included at the end of this tutorial.
Table Of Contents
- Step 1. Create Google Cloud Compute Engine Instance
- Create Compute Engine VM Instance
- Select Data Center Region & Zone
- Select Machine Type
- Select Ubuntu 16.04 / 18.04 / 20.04 Boot Disk
- Select Boot Disk Type
- Firewall – Allow HTTP & HTTPS Traffics
- Step 2. Create Static IP Address
- Step 3. Create Firewall Rule To Open Required Ports
- Step 4. Connect Google Cloud Instance To RunCloud
- Why Should You Use RunCloud?
- Connect Your Server
- Select Manual Installation
- Login To Your Server Using SSH Client
- Run RunCloud Installation Script
- Video Tutorial – Setup Google Cloud Server With RunCloud
- Next Step
Step 1. Create Google Cloud Compute Engine Instance
Sign up on the Google Cloud Platform or login to if you already have an account.
Tips: You can get free GCP credit worth USD300 to use within 12 months, and access to the GCP always free tier to try GCP with no charge.

Create Compute Engine VM Instance
From the left sidebar, please go to the "Compute Engine" – "VM instances" menu.
If you do not have any existing VM instance, click on the "Create" button on the VM instances page to create your first GCP instance. Else, click the "Create Instance" button at the top menu bar to create another new instance.

Select Data Center Region & Zone
Give your instance an awesome name and select the region and zone (datacenter location) for the instance.
Currently, Google Cloud has 24 regions and 73 zones, including Oregon, Los Angeles, Salt Lake City, Las Vegas, Iowa, South Carolina, N. Virginia, Montreal, Sao Paulo, London, Belgium, Netherlands, Zurich, Frankfurt, Finland, Mumbai, Singapore, Jakarta, Hongkong, Taiwan, Tokyo, Osaka, Sydney, and Seoul.
We recommend you to use a region and zone that is nearest to your target users/visitors. The closer your server location is to your users, the less latency they will experience.

Select Machine Type
Under the "Machine type" option, select one of the predefined GCP machine types for your instance. Each machine type gives you a certain number of vCPUs (virtual Central Processing Unit) and the amount of memory.
Select Ubuntu 16.04 / 18.04 / 20.04 Boot Disk
Next, you need to attach anUbuntu LTS boot disk to your instance. If you use RunCloud, we supports Ubuntu 16.04, 18.04, and 20.04 LTS at the moment.
For example, click the "Change" button under Boot disk, then select "Ubuntu 18.04 LTS".

Select Boot Disk Type
For the "Boot disk type" option, please select "SSD persistent disk" for better performance.
But if you want to reduce the storage costs, you can select either "Standard persistent disk" or "Balanced persistent disk".
The boot disk size is customizable from 10 GB to 65,536 GB.
Firewall – Allow HTTP & HTTPS Traffics
Finally, make sure you enable both "Allow HTTP traffic" and "Allow HTTPS traffic" under the Firewall option. This is important so that your Google Cloud server is accessible on the internet.

Click the "Create" button to build your Google Cloud server (instance).
Step 2. Create Static IP Address
By default, Google Cloud instances are assigned an ephemeral external IP address. This means a new ephemeral IP address will be assigned to your instance whenever it is stopped and started again.
If an instance is stopped, any ephemeral external IP addresses assigned to the instance are released back into the general Compute Engine pool and become available for use by other projects. (GCP Documentation)
If you use Google Cloud to host your website, it is highly recommended to use the static IP address for your server. This static IP is dedicated to you and will not be changed when you stop and restart the server.
Go to the "VPC network" – "External IP addresses" menu and please find your instance's external address.
Click the "Ephemeral" type, then select "Static" from the dropdown menu to reserve the current (ephemeral) IP address to your instance (static IP address).
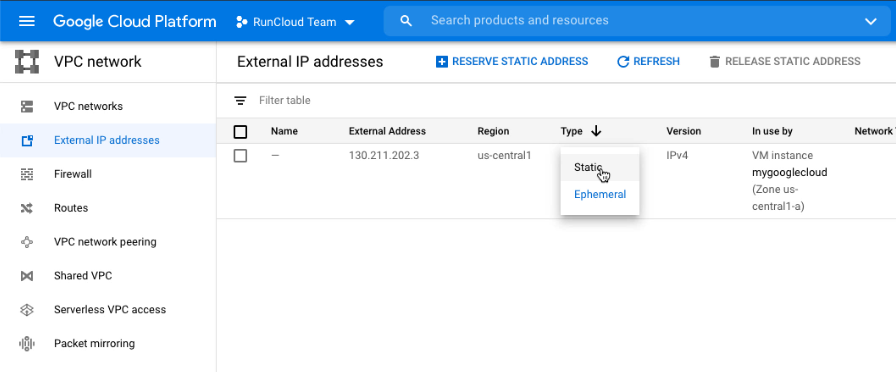
Now your Google Cloud instance has a static IP address and ready to use to host your websites.
Step 3. Create Firewall Rule To Open Required Ports
On the first step, you should have enabled "Allow HTTP traffic" and "Allow HTTPS traffic" options. It means that port 80 (HTTP) and port 443 (HTTPS) is open to the internet.
If you want to connect your server to RunCloud, you need to open TCP port 34210 in order to allow RunCloud to communicate with your Google Cloud server.
From the left sidebar, go to the "VPC network" – "Firewall rules" menu and click on "Create Firewall Rule".

You can use the following settings to create a new firewall rule:
Name: runcloud-port
Description: Required by RunCloud to access Google Cloud server
Network: default
Priority: 1000
Direction of traffic: Ingress
Action on match: allow
Targets: All instances in the network
Source filter: IP ranges
Source IP ranges: 0.0.0.0/0
Protocols and ports: specified protocols and ports: tcp:34210

It will allow all incoming traffic from any IP address to your server's TCP port 34210.
When using RunCloud, the opened TCP port 34210 at the GCP firewall will be protected by RunCloud's firewall at your server.
Step 4. Connect Google Cloud Instance To RunCloud
RunCloud is a cloud server management tool that allows you to maintainfull control of your server and host multiple WordPress, WooCommerce, Laravel, and PHP applications with fast and easy configuration. With RunCloud, you don't need to be a Linux expert to host your website, powered by Google Cloud Platform server.
Why Should You Use RunCloud?
Google Cloud has many technical tutorials about how to host your website using Google Cloud, for example:
- Running a basic Apache web server
- Setting Up LAMP on Compute Engine
Then why should you use RunCloud to set up your Google Cloud server?
- RunCloud simplifies server management experience. Either using Google Cloud or other providers, you only need to master RunCloud once for all cloud server providers. You don't need to be a Linux expert to build a website powered by Google Cloud.
- You can easily manage multiple servers (Google Cloud and others) from one single RunCloud dashboard.
- You can manage multiple web applications (websites) in one server using RunCloud.
- You can easily change the web application stack from native Nginx to Nginx-Apache2 hybrid and vice versa for each web application in your server. No need to spin a new server only to try to use Nginx or Apache.
- You can easily change the PHP version (7.0, 7.1, 7.2, 7.3, 7.4) of each web application in your server anytime. A different web application may require a different PHP version and no need to spin a new server to host another website with a different PHP version.
- You can easily set up Let's Encrypt SSL/TLS (https) to secure every web application in your server. RunCloud also supports wildcard Let's Encrypt SSL and custom certificate.
- You can easily clone your web application in the same server or to other servers in your RunCloud dashboard.
- You can get notification from RunCloud server health monitoring when server load is high, RAM memory is nearly full, and disk space is low, directly to your email, telegram, or slack.
- RunCloud supports many web applications, including WordPress (one-click install), Laravel, and any PHP web applications.
- For WordPress users, you can use RunCloud Hub to optimize your website with server-side page caching and Redis object cache.
- For professional WordPress developers, you can use the one-click WordPress Staging feature to create a staging version of your website easily.
- For professional developers, you can use Git deployment from Github, BitBucket, Gitlab, to deploy your web application easily.
- For power users, you can use the Custom Nginx Config feature to customize Nginx easily from the RunCloud dashboard, without having to edit it manually.
- For agencies, you can use our Team feature to assign a different team member to a different server with separate permission.
If you still do not have a RunCloud account, please register for 5 days free trial, no credit required.
Get Started With RunCloud
Connecting your Google Cloud server to RunCloud is very easy. RunCloud provides three different methods for connecting your cloud servers.
For Google Cloud, you can use the manual server installation method.
Connect Your Server
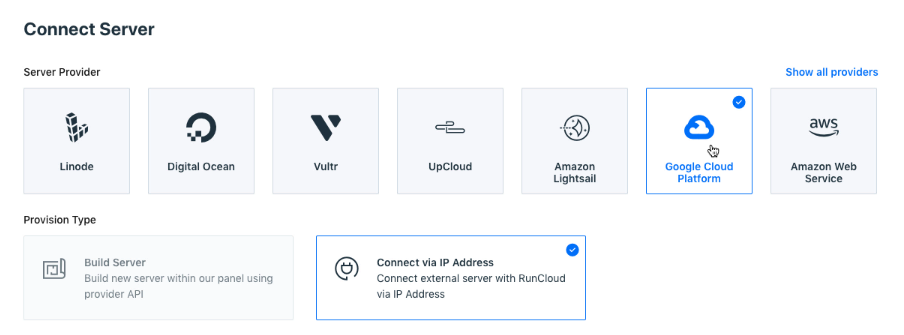
ou can log in to the RunCloud dashboard and click the "Connect a new server" button. Please select Google Cloud Platform from the Server Provider list.
Please add a server name and static IP address that you have created on Step 2. Click the "Add this server" button.
Select Manual Installation
On the next screen, you can choose "Manual Installation" and you will see the script that you have to run on your Google Cloud instance.

Login To Your Server Using SSH Client
You can go back to the Google Cloud console and find your server under VM instances.
Click on the "SSH" under Connect to launch a web browser-based terminal to log in to your server.

Run RunCloud Installation Script
We need to run the RunCloud installer script command as "root" user. Please run the command below to start a "root" shell.
sudo -s Then, paste and run the RunCloud installer script command.

The RunCloud installation will take a few minutes to complete.
You can check the installation progress at the RunCloud panel too.

Once it is completed, you will see the MySQL root password for your database management and the "runcloud" system user password. Please save this information.
If successful, data about your server will appear, and you have successfully set up your Google Cloud server with RunCloud.

Video Tutorial – Setup Google Cloud Server With RunCloud
You can watch this short video tutorial to show you all steps that we have explained above in less than 3 minutes.
Next Step
After setting up your Google Cloud server, you can continue to:
- create your first website
- add your first domain
- secure your website with https
Categories: Server Management, Tutorials
How To Create A Server On Google Cloud
Source: https://blog.runcloud.io/google-cloud/
Posted by: brenneraltaid.blogspot.com
0 Response to "How To Create A Server On Google Cloud"
Post a Comment